深度可分离卷积检测算法
Language: Python
使用TensorFlow 深度学习框架,使用Keras会大幅缩减代码量
训练机器:华为Atlas 200 AI开发板(或本地计算机)
常用的卷积网络模型及在ImageNet上的准确率
| 模型 | 大小 | Top-1准确率 | Top-5准确率 | 参数数量 | 深度 |
|---|---|---|---|---|---|
| Xception | 88 MB | 0.790 | 0.945 | 22,910,480 | 126 |
| VGG16 | 528 MB | 0.713 | 0.901 | 138,357,544 | 23 |
| VGG19 | 549 MB | 0.713 | 0.900 | 143,667,240 | 26 |
| ResNet50 | 98 MB | 0.749 | 0.921 | 25,636,712 | 168 |
| ResNet101 | 171 MB | 0.764 | 0.928 | 44,707,176 | - |
| ResNet152 | 232 MB | 0.766 | 0.931 | 60,419,944 | - |
| ResNet50V2 | 98 MB | 0.760 | 0.930 | 25,613,800 | - |
| ResNet101V2 | 171 MB | 0.772 | 0.938 | 44,675,560 | - |
| ResNet152V2 | 232 MB | 0.780 | 0.942 | 60,380,648 | - |
| ResNeXt50 | 96 MB | 0.777 | 0.938 | 25,097,128 | - |
| ResNeXt101 | 170 MB | 0.787 | 0.943 | 44,315,560 | - |
| InceptionV3 | 92 MB | 0.779 | 0.937 | 23,851,784 | 159 |
| InceptionResNetV2 | 215 MB | 0.803 | 0.953 | 55,873,736 | 572 |
| MobileNet | 16 MB | 0.704 | 0.895 | 4,253,864 | 88 |
| MobileNetV2 | 14 MB | 0.713 | 0.901 | 3,538,984 | 88 |
| DenseNet121 | 33 MB | 0.750 | 0.923 | 8,062,504 | 121 |
| DenseNet169 | 57 MB | 0.762 | 0.932 | 14,307,880 | 169 |
| DenseNet201 | 80 MB | 0.773 | 0.936 | 20,242,984 | 201 |
| NASNetMobile | 23 MB | 0.744 | 0.919 | 5,326,716 | - |
| NASNetLarge | 343 MB | 0.825 | 0.960 | 88,949,818 | - |
由于硬件条件限制,综合考虑模型的准确率、大小以及复杂度等因素,采用了Xception模型, 该模型是134层(包含激活层,批标准化层等)拓扑深度的卷积网络模型。
检测算法
def Xception(include_top=True,
    weights='imagenet',
    input_tensor=None,
    input_shape=None,
    pooling=None,
    classes=1000,
    **kwargs)

# 参数
# include_top:是否保留顶层的全连接网络
# weights:None代表随机初始化,即不加载预训练权重。'imagenet’代表加载预训练权重
# input_tensor:可填入Keras tensor作为模型的图像输入tensor
# input_shape:可选,仅当include_top=False有效,应为长为3的tuple,指明输入图片的shape,图片的宽高必须大于71,如(150,150,3)
# pooling:当include_top=False时,该参数指定了池化方式。None代表不池化,最后一个卷积层的输出为4D张量。‘avg’代表全局平均池化,‘max’代表全局最大值池化。
# classes:可选,图片分类的类别数,仅当include_top=True并且不加载预训练权重时可用
设置Xception参数
迁移学习参数权重加载:xception_weights
 # 设置输入图像的宽高以及通道数
 img_size = (299, 299, 3)

 base_model = keras.applications.xception.Xception(include_top=False,
                                                 weights='..\\resources\\keras-model\\xception_weights_tf_dim_ordering_tf_kernels_notop.h5',
                                                 input_shape=img_size,
                                                 pooling='avg')

 # 全连接层,使用softmax激活函数计算概率值,分类大小是628
 model = keras.layers.Dense(628, activation='softmax', name='predictions')(base_model.output)
 model = keras.Model(base_model.input, model)

 # 锁定卷积层
 for layer in base_model.layers:
   layer.trainable = False
全连接层训练(v1.0)
 from base_model import model

 # 设置训练集图片大小以及目录参数
 img_size = (299, 299)
 dataset_dir = '..\\dataset\\dataset'
 img_save_to_dir = 'resources\\image-traing\\'
 log_dir = 'resources\\train-log'

 model_dir = 'resources\\keras-model\\'

 # 使用数据增强
 train_datagen = keras.preprocessing.image.ImageDataGenerator(
     rescale=1. / 255,
     shear_range=0.2,
     width_shift_range=0.4,
     height_shift_range=0.4,
     rotation_range=90,
     zoom_range=0.7,
     horizontal_flip=True,
     vertical_flip=True,
     preprocessing_function=keras.applications.xception.preprocess_input)

 test_datagen = keras.preprocessing.image.ImageDataGenerator(
     preprocessing_function=keras.applications.xception.preprocess_input)

 train_generator = train_datagen.flow_from_directory(
     dataset_dir,
     save_to_dir=img_save_to_dir,
     target_size=img_size,
     class_mode='categorical')

 validation_generator = test_datagen.flow_from_directory(
     dataset_dir,
     save_to_dir=img_save_to_dir,
     target_size=img_size,
     class_mode='categorical')

 # 早停法以及动态学习率设置
 early_stop = EarlyStopping(monitor='val_loss', patience=13)
 reduce_lr = ReduceLROnPlateau(monitor='val_loss', patience=7, mode='auto', factor=0.2)
 tensorboard = keras.callbacks.tensorboard_v2.TensorBoard(log_dir=log_dir)

 for layer in model.layers:
     layer.trainable = False

 # 模型编译
 model.compile(optimizer='rmsprop', loss='categorical_crossentropy', metrics=['accuracy'])

 history = model.fit_generator(train_generator,
                               steps_per_epoch=train_generator.samples // train_generator.batch_size,
                               epochs=100,
                               validation_data=validation_generator,
                               validation_steps=validation_generator.samples // validation_generator.batch_size,
                               callbacks=[early_stop, reduce_lr, tensorboard])
 # 模型导出
 model.save(model_dir + 'chinese_medicine_model_v1.0.h5')
对于顶部的6层卷积层,我们使用数据集对权重参数进行微调
 # 加载模型
 model=keras.models.load_model('resources\\keras-model\\chinese_medicine_model_v2.0.h5')

 for layer in model.layers:
    layer.trainable = False
 for layer in model.layers[126:132]:
    layer.trainable = True

 history = model.fit_generator(train_generator,
                               steps_per_epoch=train_generator.samples // train_generator.batch_size,
                               epochs=100,
                               validation_data=validation_generator,
                               validation_steps=validation_generator.samples // validation_generator.batch_size,
                               callbacks=[early_stop, reduce_lr, tensorboard])
 model.save(model_dir + 'chinese_medicine_model_v2.0.h5')
在后端项目中,我们使用Deeplearn4j调用训练好的模型 ``` public class CnnModelUtil {
 private static ComputationGraph CNN_MODEL = null;

 /**
  * 中药名字的编码
  */
 private static final Map<Integer, String> MEDICINE_NAME_MAP = new HashMap<>();

 /**
  * 定义cnn model的文件夹路径
  */
 private static final String DATA_DIR = System.getProperty("os.name")
         .toLowerCase().contains("windows") ? "D:\\data\\model\\"
         : "./data/model/";

 /**
  * 定义中药编码表的文件名
  */
 private static final String MEDICINE_LABLE_FILE_NAME = "medicine_name-lable.txt";

 /**
  * 定义模型的文件名
  */
 private static final String CNN_MODEL_FILE_NAME = "chinese_medicine_model.h5";
    /**
     * 图片的加载器
     */
    private static final NativeImageLoader IMAGE_LOADER = new NativeImageLoader(299, 299, 3);


    /**
     * 初始化
     */
    static {
        try {
            CNN_MODEL = KerasModelImport.importKerasModelAndWeights(DATA_DIR + CNN_MODEL_FILE_NAME);

            Files.readAllLines(Paths.get(DATA_DIR, MEDICINE_LABLE_FILE_NAME)).forEach(v -> {
                String[] split = v.split(",");
                MEDICINE_NAME_MAP.put(Integer.valueOf(split[1]), split[0]);
            });
        } catch (IOException | InvalidKerasConfigurationException | UnsupportedKerasConfigurationException e) {
            e.printStackTrace();
        }
    }

    /**
     * 对图像进行预测
     * 对预测的概率值进行排序处理
     * 返回值是概率值前10的中药的名字
     * @param file
     * @return
     * @throws
     */
    public static Map<String, Float> medicineNamePredict(File file) throws IOException {
        INDArray image = IMAGE_LOADER.asMatrix(file).divi(127.5).subi(1);
        INDArray output = CNN_MODEL.outputSingle(image);
        Map<Integer, Float> resultMap = new HashMap<>();
        float[] floats = output.toFloatVector();
        for (int i = 0; i < floats.length; i++) {
            resultMap.put(i, floats[i]);
        }
        List<Map.Entry<Integer, Float>> resultList = new LinkedList<>(resultMap.entrySet());
        resultList.sort(Map.Entry.comparingByValue(Comparator.reverseOrder()));
        Map<String, Float> medicinePredict = new LinkedHashMap<>();
        resultList.stream().limit(10).forEach(v -> {
            medicinePredict.put(MEDICINE_NAME_MAP.get(v.getKey()), v.getValue());
        });
        return medicinePredict;
    }
}
```
模型概览
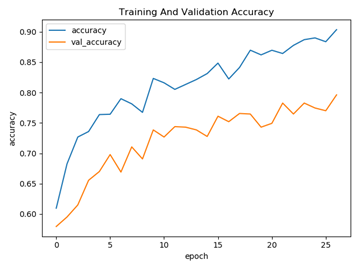
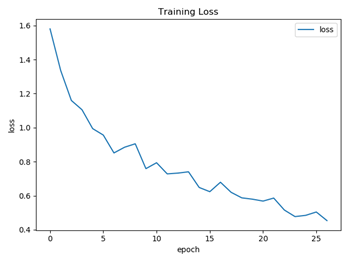
训练过程正确率以及损失函数可视化展示

